Sunday, July 15, 2018

Headbands Are All the 'Math' Rage!

Where do I start with this little piece of genius I was taught a few summers back?!?!  There are no words for the educational value of these 6 strips of paper.  


Way back in the summer of 2016, my life was forever changed when I joined a grant through Texas Regional Collaboratives.  UTMB in Galveston had a Grant taught by Valerie Blackburn and Jennifer Clayton.  

So of course, I needed to create one for my class.  This little gem was shared and it has snowballed on our campus!  Yes, almost all levels of core math use it now. 


The first one was a little more intense than I realized and lasted way longer than I planned BUT the results were well worth it!  We spent 30 minutes in my Algebra 1 class doing the slope from tables one.  I was able to get a lot of formative assessment and in the end ALL students completed and worked diligently on 6 critical problems. 


This resulted in one of my favorite teaching moments of all time... 

Student: 'What's the point of this?'
Me: **thinking quickly of a witty response** 'When you put it on your head, you are learning by osmosis."  **secretly hoping they buy this**
Students:  'Oh my gosh, we are learning about that now in biology!! Cool!!'
Me: **thinking score cross-curricular vocabulary.**

I sent it to my principal laughing at the cross-curricular tie and it ended up going all though the district.  I even had teachers telling me students were wearing it in the cafeteria.  Later that year one student pulled it out and put it on during a test and when I asked him why, he said it made him feel smarter.  #teachermoment

Now let me share how to create your very first headband!  Any 6 problems will work and it is basically like a scavenger/mouse hunt.  You place the answer to a different problem on the left of the headband and a problem in the middle.  They solve the problem and connect/match it to the answer on a different piece forming a complete headband!


What I made a mistake of and was a reason the first time took so long was that you want to make all pieces connected like above.  The first time I had each piece with a space between and those precision cutters took forever!

AND DO NOT make them in order either... or then you have to redo and mix them all up... I've already been there, done that!

Each student recieves one copy of the headband to cut and construct.  I have a cut one projected on the board to show expectations. Sometimes I'll work one but most of the time I just demonstrate my expectations about connecting.  They solve the problem and look for the answer on another piece them solve that problem until they are back to the first piece.  Instant assessment for them which are my favorite kind of activities. 


I also have all mine designed to fit on 1 page.  Just as an FYI... these are great for those dark colored papers you might have that you can't really use for a WS.

AND don't worry, I've got templates for you as well as ALL my headbands shared below!

Another tip is to have students tape or staple them together so they can put them on right away.  And they will likely need to overlap and measure as they go.  I make them show work on the bands and just cover the answer or arrow.  One kiddo ended up making a belt instead so they can be pretty big. 

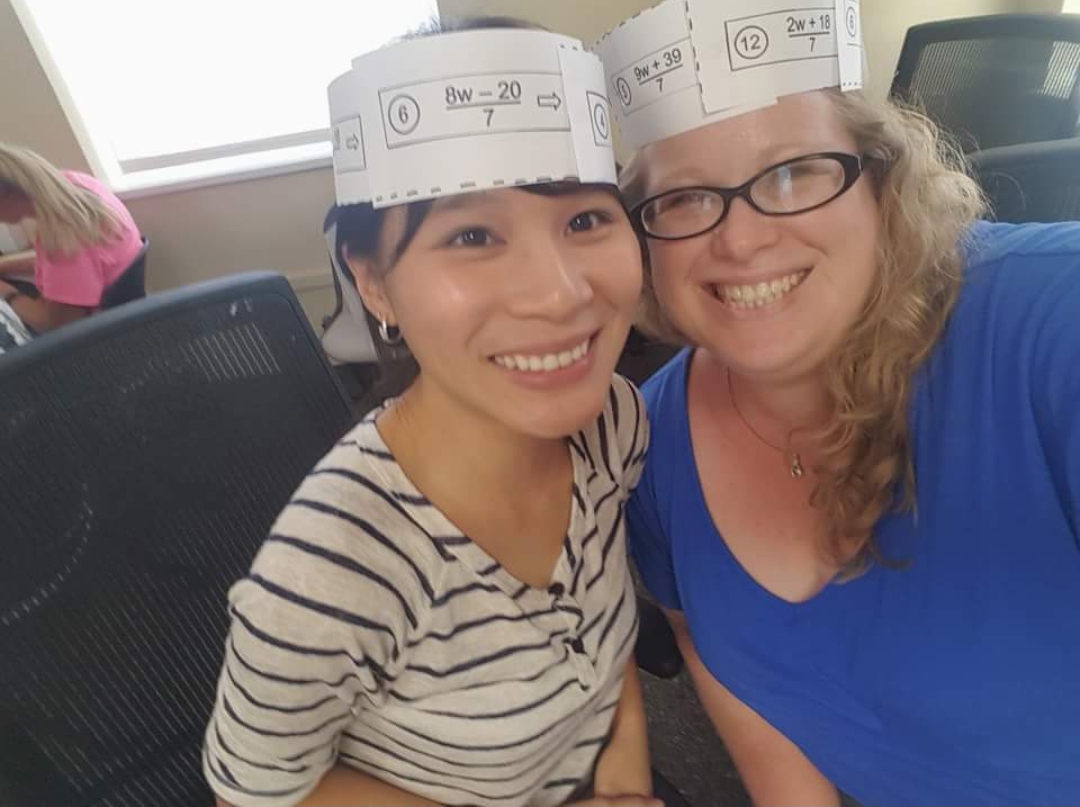
Here is what a couple of completed ones look like...


To store them, I just added a headband envelope in our notebook.


I'm not really sure how to say that I love these things!  I love seeing seniors wear them and post on their social media.  I even offer some credit for wearing them outside my class.  Anything to have kids talk about math!  

Some get creative with their'Headbands' too...


Get all resources here for FREE!!!  


I have them both in Word and PDF as always!  If you want my font, Janda Curly Girl, it is downloadable for free here!  It's one of my favorites!!

For any keys, please feel free to email me at camfan54@att.net from your school or professional account.  I've had students try and email for keys in the past but luckily their email said student! 

Enjoy the rage!!
Lisa

Friday, July 13, 2018

Build Me a Castle Review

How do you get your classes to finish 1,217 problems in 2 days? Give them a cup after each one!! Build me a Castle Review, SUCCESS! Crazy busy but so worth it!


A while back I saw a post online that someone did a review where after each problem, they received a cup to stack.  So simple and sooooooo engaging... so I thought!  Not so simple really.  It was fast.  It was furious.  It was rigorous.

Of course we couldn't just stack cups right?  We needed a theme!  The student above, Anosha and I came up with Build Me A Castle!  We ordered tiaras and even dressed princess themed the first day.  I didn't get a picture because we were going crazy.  This is not a review for the weak.

First, I laminated and used a bunch of task cards I had.  I even made one for standard to slope-intercept form.  Most of mine came from Algebra Accents on Teachers Pay Teachers.  I purchased her whole curriculum several years ago and it has been one of my best investments ever!  The ones I used will be listed below if you are interested.

Really, any matching game can be used.  I'll include my slope matching game that you could just use the graphs for.

To say the students loved it would be an understatement. They did not stop. We did it for 2 solid days and they answered non-stop. I threw out easy and hard. Order of ops to exponential functions. It was a great spiral for the semester exam as I did it just before the end of the year.


I gave each student a wipe board to show their answer on. Each day I had about 5 task card stacks. Each group got one from each stack to start regardless of how many group members they had. It is easiest for you if each card stack is a different color. As each student solved, they came up to the teacher to check answers. If correct, they took a cup and a different problem. If wrong, you could have them correct of offer instruction.


I was surprised that as fast as it was moving, we were able to differentiate pretty good and make sure students were doing a variety of problems. At the end of the day, we took a cup count and let them start with that the next day. Another option is castle height or design.


The above were our winning group with 120 cups. I had them compete within the class then across my classes. Either way, they loved it and every group was able to spiral review.

It was a great activity I will use several times each year. I think my favorite thing was a way to use all those task cards again!!! I needed about 300 cups as an FYI.

Get a couple of my task cards for FREE here.  I will add any other task cards I create in the same folder so you can check back throughout the school year.  The ones I included right now are:

Slope Matching Activity with these graph cards:

Standard to Slope-Intercept Form


The Algebra Accents ones I used and were worth every penny (I think most are $3) were:


Enjoy!
Lisa


Let's Code and Roll... the Ozobot DICE!


I was really trying to work in the Ozobots once more this year!  We did not get them until December so we only had a semester, in addition to the shortened curriculum because of Hurricane Harvey, to use them.  I get so easily excited that I always end up over doing but we had some 'extra' time to work on geometry and I decided to work in a little coding.  How I feel about coding in math has been communicated quite extensively by me.  My colleagues and friends are surely sick of it but I can not see a better fit than order of operations and accuracy in math.  Beyond that are careers, life lessons, and of course interactions beyond the standard social media.

Read about my initial ideas and Ozobot lessons here.


I also wrote more about coding and math here.

Guest Blog: Ozobots in Algebra 1


So here comes the end of the year.  Kids are tired.  State tests are taken.  They need some motivation and engagement to get through the final haul of what has been a roller coaster Texas school year.  I decided a nice poster project to round out the Geometry Unit would be nice.  I could not have been more happy with the results.  The students blew me away with their coding and concepts mastery.  It was so rewarding and a great way to further practice our coding in math!

I first created dice with a combination of coding and geometry concepts.  There are 4 unique dice.  2 are numbered and 2 are lettered so you can mix it up.  I printed all the numbers on blue and letters on orange and laminated them.


For the instructions, I put the codes for all the dice under each number so they could just circle which ones they rolled.  I also created a rubric on the back.  I also stated to roll a dice and complete the action then roll again.  Some groups did all their roles then created so it is completely up to you.


 I also encouraged adding extra to it as well.  Many kids were so excited that they were scared to add more and mess it up.  I loved their excitement and pride in their work.  One young lady even asked we send the video to her Mom 😍 They just watched their Ozobot perfectly travel the line for about 15 minutes.  It was fabulous!


I provided one piece of the gridded chart paper to help with the geometry concepts.


One of the discussions we had was what happened when Ozobot chose left instead of right or got stuck somewhere?  All groups had worked that out and accounted for it in their projects.  It was educational magic!!

I have since firther developed in, incorporating space and fine turning where they get an even number of Geometry concepts and coding!


As an additional fun note, we did this activity with a Texas theme in my WeTeach_CS face-to-face!  This was teachers completing it and below is one of the completed ones....


Enjoy!
Lisa